How to Share Outlook Calendar
- In Outlook Web App (https://exchange.cisaz.com), click Calendar in the Navigation Pane.
- Click Share on the Calendar toolbar.
- Click Change Sharing Permissions and then, in the Calendar dialog box, select the name of the calendar that you want to change sharing permissions for.
- Click the name of the person whose permissions you want to change.
- Click Edit and select the permissions you want.
- Click Save to save your change.
What are the different permission levels for calendar sharing?
By default, all users can view other staff members free/busy time by simply loading the person's calendar in OWA. If a staff member wants to allow greater visibility, they can choose the next option in sharing which is Free/Busy information including subject and location. The difference between the permissions looks like this:
Free/Busy Only:


Contributor - the person can create events on your calendar but can't view your calendar and can not modify or delete any events that have been placed on the calendar. Events can be dropped on your calendar only.
Nonediting Author - the person can create events on your calendar and view your calendar but can not modify any events once they have been have placed on your calendar or delete any of your events. Events created by this person can be deleted but this person has no permission to modify any event.
Author - the person can create events on your calendar and view your calendar but can not modify or delete any events that you have placed on your calendar. Only those events created by this person can be modified or deleted.
Publishing Author - the same permission level as Author but can also create sub-folders. Editor - the person will be able to create and view events on your calendar and will also be able to modify and delete any event on your calendar. You are effectively giving the person full read and write access to your calendar.
Editor - the person will be able to create and view events on your calendar and will also be able to modify and delete any event on your calendar. You are effectively giving the person full read and write access to your calendar.
Publishing Editor - the same capability as Editor but can also create sub-folders.
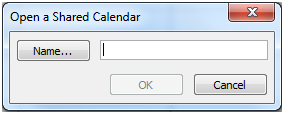
Once he shares it with you, you'll need to add it to your calendars from within YOUR Outlook:
- In the Outlook calendar view, click Open Calendar, then Open Shared Calendar.

- Type the name or click on Name to access the Global Address List. Click OK when you are finished.
Related Articles
Steps to update Outlook password in the cloud
Outlook 2013 + email update password issue, these are the steps to re-enter your Outlook password when it prompts you in the cloud. 1. go to account settings ->More Settings -> security -> check require password 2. close outlook 3. open outlook -> ...Can't Search in Outlook fix - re-indexing options
1. Go to Control Panel, indexing Options 2. Inside that window, click on "Microsoft Outlook" and then click the "Advanced" button 3. In the middle of the screen on the next window, you will see "rebuild" button, click it. Click "ok" when the warning ...Manage blocked senders in Outlook
How to manage blocked senders in Outlook: From the Home tab, click on “Junk” on the ribbon, then click on “Junk E-Mail Options” Once the Junk E-Mail Options window opens, click on “Blocked Senders” tab at the top: From here, you can manually add, ...How to disable or turn off the Panning Hand cursor in Outlook 2007
If you're using Outlook 2007 and you have a mysterious "Panning hand" cursor that won't let you select text in an email, and want to turn it off, but can't find the option, here's how: Click the Customize Quick Access Toolbar pull down: Choose “More ...Manual setup "Exchange" email Outlook 2010 & 2013
1. Go to your control panel click on the "MAIL" icon ( ignore 2016 ) 2. Click on "ADD" new profile & name it whatever you want ( Hosted Exchange for example ). 3. Choose Manual Setup ( Only if the auto setup has previously failed to setup correctly ...